 ">微信
">微信When you know exactly what you’re looking for, you don’t need to search for it; you just have to find it.
This tutorial will help you understand how to use the find command effectively in a CTF context. It is written in a way that you won’t have to refer to the man page to complete it, although I recommend the man page for further reading.
The syntax of the command can be broken down as such:
find where what
Firstly you tell the system to find something; secondly you tell it where to look; and finally, you tell it what to look for.
You don’t need to specify when you’re looking in your working directory. Also, you can use wildcards as well, in specifying both a directory and a name.
Note: There’s no VM to deploy in this room. You only need to enter the commands that would be used to find what the questions ask for. You can also test the commands on your own terminal (if you have access to a Unix or Unix-like system) to check the output of find with different options. However, that’s not necessary; this is a walkthrough, and everything you need to solve this room is in the tasks’ description.
On your terminal, execute the command:
touch file-1 file-2
This command will create two files, named file-1 and file-2 respectively, in your current working directory.
Now, execute:
find file*
As you can see, the command outputs both of your files.
This time, execute:
find *1
Only file-1 is in the output.
These commands are useful when you want to specify only part of the name of what you’re looking for.
Most of the time, you won’t be looking for something in your working directory. The first argument of your find command should be the directory you want to search. The command will search in that directory and in all its subdirectories. So, if you want to search the whole filesystem, your command should begin with find /.
Two very useful flags are the -type and -name flags. With -type, you can use d to only find directories, and f to only find files. The -name flag is used to specify a name or pattern to look for. You can type the whole name, or use wildcards to specify only part(s) of the name. If you use wildcards, you need to enclose your pattern in quotes, otherwise the command won’t work as intended. It is useful to know that you can also use the -iname flag; same as -name, but case insensitive.
In some situations, specifying just the name of a file will not be enough. You can also specify the owner, the size, the permissions, and the time the file was last accessed/modified as well.
The username of the owner of a file is specified with the -user flag.
The size of a file is specified with the -size flag. When using numerical values, the formats -n, +n, and n can be used, where n is a number. -n matches values lesser than n, +n matches values greater than n, and n matches values exactly n. To specify a size, you also need a suffix. c is the suffix for bytes, k for KiB’s, and M for MiB’s. So, if you want to specify a size less than 30 bytes, the argument -30c should be used.
The -perm flag is used to specify permissions, either in octal form (ex. 644) or in symbolic form (ex. u=r). See here for a short reference. If you specify the permission mode as shown above (ex. 644 or u=r), then find will only return files with those permissions exactly. You can use the – or / prefix to make your search more inclusive. Using the – prefix will return files with at least the permissions you specify; this means that the -444 mode will match files that are readable by everyone, even if someone also has write and/or execute permissions. Using the / prefix will return files that match any of the permissions you have set; this means that the /666 mode will match files that are readable and writeable by at least one of the groups (owner, group, or others).
Lastly, time-related searches will be covered. These are more complex but may prove useful. The flag consists of a word and a prefix. The words are min and time, for minutes and days, respectively. The prefixes are a, m, and c, and are used to specify when a file was last accessed, modified, or had its status changed. As for the numerical values, the same rules of the -size flag apply, except there is no suffix. To put it all together: in order to specify that a file was last accessed more than 30 minutes ago, the option -amin +30 is used. To specify that it was modified less than 7 days ago, the option -mtime -7 is used. (Note: when you want to specify that a file was modified within the last 24 hours, the option -mtime 0 is used.)
To conclude this tutorial, there are two more things that you should know of. The first is that you can use the redirection operator > with the find command. You can save the results of the search to a file, and more importantly, you can suppress the output of any possible errors to make the output more readable. This is done by appending 2> /dev/null to your command. This way, you won’t see any results you’re not allowed to access.
The second thing is the -exec flag. You can use it in your find command to execute a new command, following the -exec flag, like so: -exec whoami \;. The possibilities enabled by this option are beyond the scope of this tutorial, but most notably it can be used for privilege escalation.
未经允许不得转载:萌萌Apprentissage » linux command – find
 查看所有linux command执行命令和数量
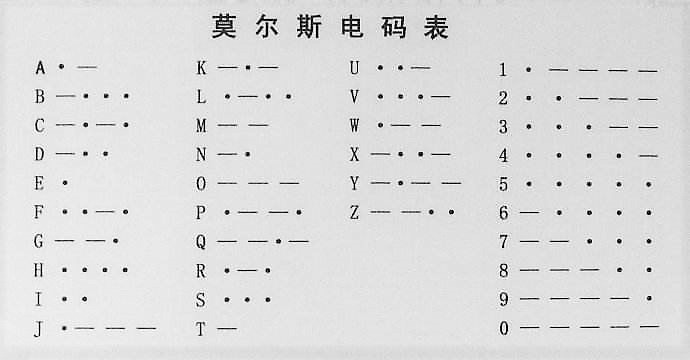 摩斯电码
摩斯电码 Learn html_How websites work
 learn NMAP
